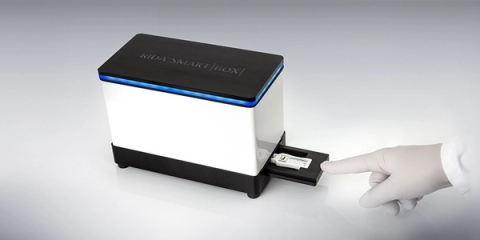

1. Consumables included in the RIDA®QUICK kit (for example Aflatoxin RQS)
- Test strip (individually packaged) — 1 strip per analysis.
- Extraction solution (usually a concentrate, for example "extraction solution 10×") — must be diluted as instructed to make a usable extraction solution.
- Dilution buffer (if the kit requires extending the measuring range).
- "RIDA®SMART APP cover" (the cover/sticker assessed by batch) — usually included in the kit and mandatory when evaluating with the RIDA®SMART APP (lot-specific).
2. Consumables and accessories that must be available (not always inside the kit)
- Micropipette 100 µl and matching tips (sterile, disposable).
- Centrifuge tubes / test tubes (for example 15–50 mL), or small tubes suitable for holding the extract.
- Filter paper/filter tube (if the procedure calls for filtration) — depends on the kit: many kits require centrifuging to obtain particle-free liquid; some places use a filter set instead of centrifuging.
- Single-use sample containers (disposable cups/tubes) for mixing/extraction.
3. Auxiliary equipment (must be available)
- RIDA®SMART BOX (to photograph the strip automatically) or an Android smartphone + RIDA®SMART APP (if the phone camera replaces the Smart Box). Note: the app requires Android ≥ 8.1 and must use the cover by lot; RIDA®SMART BOX connects over Wi-Fi or Bluetooth.
- Grinder (to grind solid samples such as cereals).
- Analytical balance (weighing scale) to weight the sample amount accurately (usually 5–25 g depending on the kit).
- Volumetric flask / graduated cylinder, or a 1 L flask, for diluting the extraction solution if the kit provides a concentrate.
- Shaker (for example Rock-it 360 or equivalent) — used to mix/extract the sample. Time and intensity follow the kit instructions.
- Centrifuge ≥ 2000 × g (most instructions recommend centrifuging to get a particle-free solution before testing).
- Tube rack/stand, pipette rack, gloves, safety glasses, biohazard bin — biosafety & waste management.
- Computer/smartphone with the RIDA®SMART APP installed and, if needed, Wi-Fi connection to the RIDA®SMART BOX to store/export results.
4. Other consumables
- Distilled or deionized water (per the buffer preparation requirement).
- Syringe filters or filter paper (if no centrifuge is available).
- Marker/stickers to assign sample IDs.
- Absorbent paper/lint-free wipes to clean the device/tray.
5. The general test procedure (applies to most RIDA®QUICK mycotoxin kits when used with RIDA®SMART APP / RIDA®SMART BOX)
Note: each mycotoxin type / matrix (cereals, flour, milk, etc.) may have different sample steps and times — always follow the "Instructions for Use" (IFU) of the specific kit first. Below is the general procedure, abstracted from the RIDA®QUICK IFUs (for example Aflatoxin RQS).

Step 1: Preparation
- Put on gloves, take the kit out of the refrigerator (if stored at 2–8 °C), and let it come to room temperature as instructed. Check the expiry date.
- Install/check the RIDA®SMART APP on the smartphone; scan/log in if needed; make sure the (lot-specific) cover is available. Start the RIDA®SMART BOX.
Step 2: Prepare the extraction solution
- If the kit has a concentrate (for example 10×), dilute it at the instructed ratio (usually 1 part concentrate : 9 parts water) and mix/homogenize. (In Aflatoxin RQS, for example: dilute 10× → 1:9, mix for 5 minutes).
- Store the diluted solution as instructed (for example 8–10 weeks at 2–8 °C, if stated).
Step 3: Prepare the sample
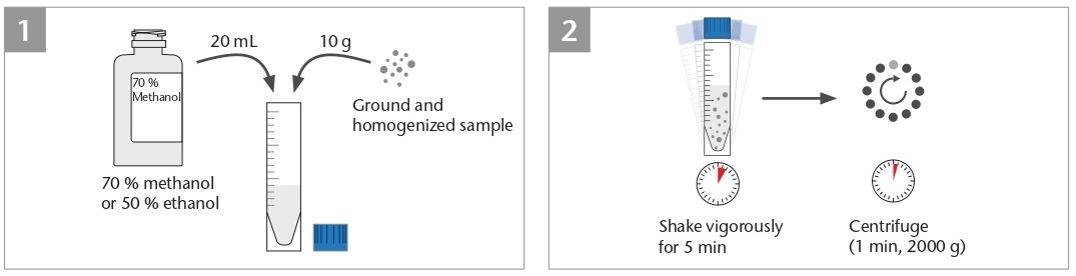
- Grind/homogenize the solid sample (for example maize) until smooth; weigh the sample amount per the IFU (for example 10 g).
- Add the extraction solution at the ratio given (for example 10 g sample + 20 mL extraction solution).
- Shake/agitate (shaker) for the required time (for example 5 minutes).
Step 4: Remove particles & clean up the extract
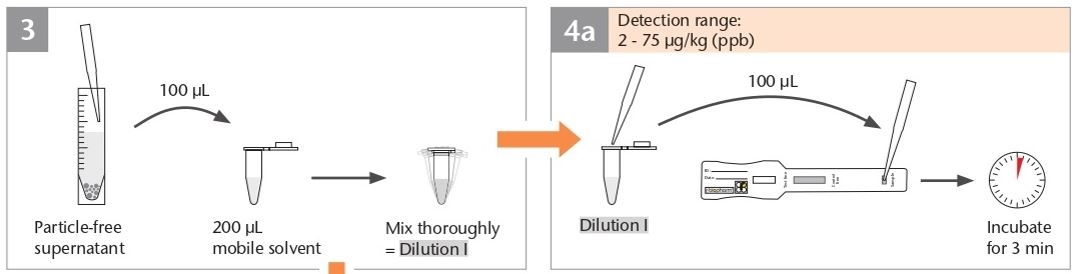
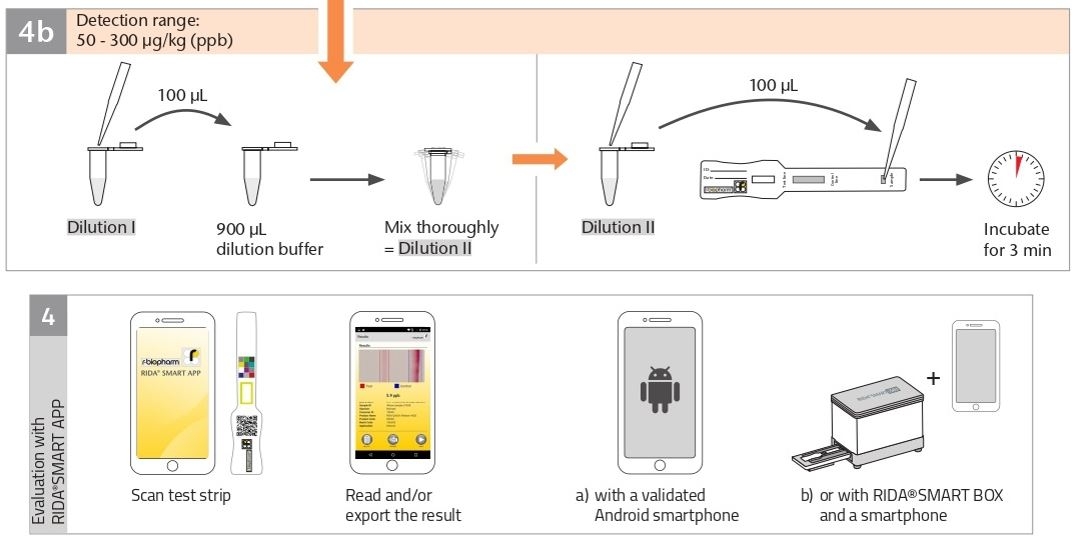
- Centrifuge (for example 3 minutes at 2000 g) or filter to obtain a particle-free liquid. Take the clear liquid (particle-free supernatant). If the concentration is too high for the measuring range, dilute as instructed (for example dilute 1:8 with the dilution buffer to fit a higher range).
Step 5: Handling the test strip
- Take the strip out of the pouch just before use. Place the strip on a clean surface.
- Use the pipette to take the defined volume (usually 100 µl in many RIDA®QUICK kits) and apply it to the application area (sample) on the strip.

Step 6: Incubate
- Incubate the strip at room temperature for the exact time per the IFU (for example Aflatoxin RQS: 5 minutes), and do not read too early or too late.
- Put the strip into the RIDA®SMART BOX (open the drawer, right way round) and use the RIDA®SMART APP software to read the result directly on the phone. The software analyzes the intensity of the test/control lines and calculates the concentration by the lot-specific curve.
Step 7: Storing & exporting the results
- The result is displayed in the app; it can be saved/exported as a file, printed, or synchronized with the QC system if the RIDA®SMART BOX is networked. Note the kit lot, the expiry, and the sample ID.
Step 8: Disposal after analysis
- Dispose of the strip and used solutions per the waste rules; clean the device; keep the records.
6. Some important notes
- Always use the evaluation cover of the right lot when using the RIDA®SMART APP — otherwise the app reports an error or gives inaccurate results.
- Incubation time and sample volume must be exact (for example 100 µl and exactly 5 minutes for Aflatoxin RQS) so results are comparable between measurements.
- If there is no centrifuge, use an equivalent filtration step — but remember the standard IFU is usually based on centrifuging, so results may differ if this step is changed.
- Quality control: run calibration/blank samples when needed, and keep the Quality Assurance Certificate (which comes with the kit) because it contains the standard/lot parameters.